

Introduction
After being rebuffed in his assault on the Rosewood Bridge, King Billiam’s forces retreated to their home base just in time to receive word that a contingent of Basileans were marching on Dwarf territory. Setting up on the northern outskirts of Alrenn within the mountains, the Dwarfs believed that they could use the familiar mountain terrain to their advantage.
Unknown to the Dwarfen king, the Basilean force led by Gnaeus Sallustis was simply on its return to the Temple of Arabos, weary but full of pride at their recent victory over the evil Hag-queen to the south. When scouting lancers found Gnaeus as he strode alongside the monstrous lion Nakir, bearing news of a force of Dwarfs blocking the road forward, the High Paladin was saddened at the necessity of spilling the blood of one of the Noble Peoples, but resolute that nothing obstruct the legion in its march back to secure the Temple. Most of the defenders had ventured south on his quest, and his concern for the holy land’s safety was foremost in his mind.
For this game we played a new v3 scenario, Fool’s Gold. This didn’t necessarily match the narrative of the Basilean forces returning home without a thought for who claimed the land they marched through, but we wanted to try out one of the new scenarios both for ourselves and as a mini-review for you, dear reader.
Billy’s List

I wanted to try out some of the cool new things that are available to the Dwarfs. Unfortunately, my definition of “weird list” and Chris’ are completely different. I really wanted to give cannons a try, so I brought 2 of those and a Steel Juggernaut. I also HAD to take a horde of Shieldbreakers because of course you do. Finally, I wanted to see how the new Throwing Mastiffs fared in a battle.
Chris’ List
I was going to defend myself by saying I hadn’t pledged to try something “weird,” but alas, I checked the Internet and those were my exact words. It was something new for me, however; I wanted to try out the Ogre Palace Guard Captains, and so I took 3!

The rest of my list was pretty standard for my v3 games so far — a solid core of Paladin Foot Guard regiments and Ogre Palace Guard hordes with a Priest for Heal and Inspiring support, 2 Paladin Knight regiments with Pathfinder and Strider, Gnaeus to escort the knights (and as he fits the narrative!), and a Paladin Chaplain as a bit of chaff, chaff removal, and war engine hunting.
The 3 Ogre Palace Guard Captains were my “weird” trial. My thinking was they’d be even better than the Paladin Chaplain at chaff, chaff removal, and war engine hunting, as their nerve of 13/15 with Inspiring for themselves and the OPG hordes is fantastic. They’re also Nimble Sp6 units with 5 CS2 attacks, Me3, and Brutal, so I was hoping they might fit the role of mini-Ur Elohi. Overall, they were good, but I feel I could have used them better.
In v2, I often struggled to get above 16 Unit Strength (US) with Basilea, as much of the army was elite and costly, and Elohi units suffered from the -1 US due to flying. In v3, however, my armies have all been relatively high, and I felt that 22 US at 2000 points was respectable.
Scenario
In Fool’s Gold, each player places 5 objective markers on their opponent’s half of the board. Placement-wise, these function as any other objective marker — they may not be within 3” of blocking terrain or 12” of another marker. The catch is that 2 of these objective markers are actually worth 0 Victory Points (VP), while another 2 are worth 1 VP and the last is worth 2 VP. So there are 4 “false” objectives, 4 1 VP objectives, and 2 2 VP objectives, for a total possible end score of 8 VP.
As we were playing on Universal Battle rather than face to face, we used the old gentleman’s agreement and reliance on honesty.
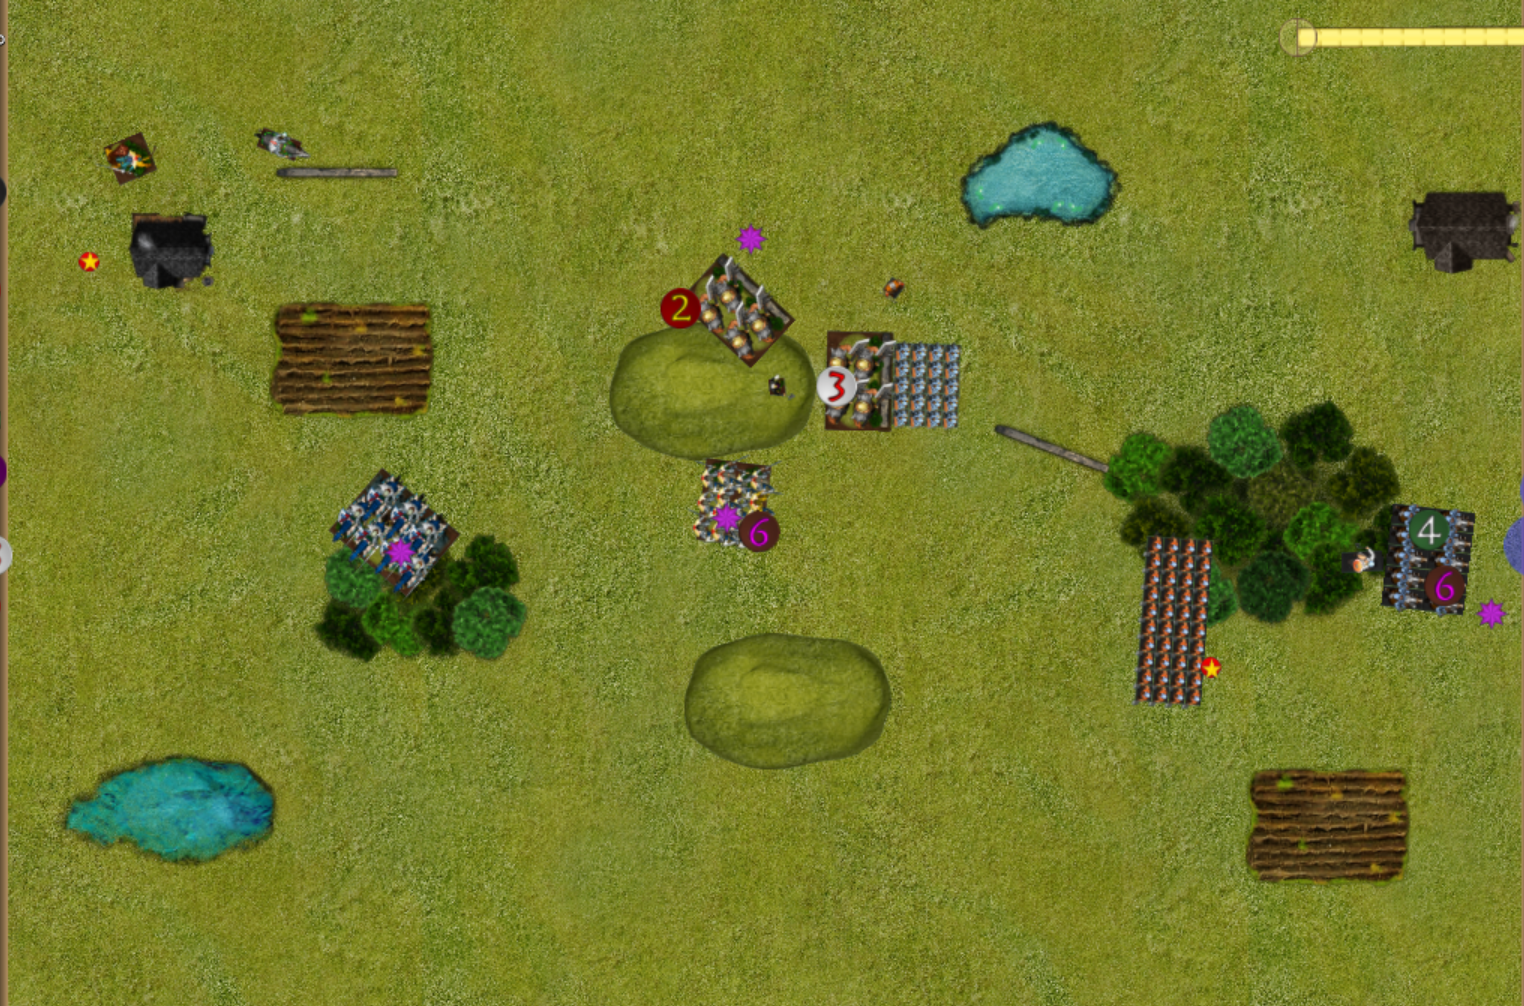
Unfortunately, Billy performed the Universal Battle equivalent of flipping the table by “accidentally” not saving any of our screenshots! (Chris: Irrespective of how true this is, he would have been totally justified; please read on for a perfect example of how NOT to roll virtual dice!) We have a few screenshots mostly of the later turns, and the below is from the end of Turn 1. Ignore the units for a moment so we may discuss objective placement (the red dots, with the value of each represented by the numbers — these values were however not public knowledge at the time!).

Chris’ Placement
As Billy’s force was much slower, I wanted to force him to place as many objectives deep into my territory as he could. I won the rolloff and placed one as close to the center as possible, and I continued to place objectives in this manner throughout so that Billy would have to put his approximately 12” from the center line. I also wanted to keep the VP objectives as close together as possible, as I knew my core force would want to stay in line. I placed my 2 VP objective to the far left by a house, a location I hoped Billy would not be able to reach easily given his various hordes. I intended for an Ogre Palace Guard Captain to secure that objective and sit on it throughout the game, but a few cannons had a thing to say about that.
Setup through Turn 1

Basilean deployment saw the Ogre Captains go down first across the entire board, mostly trying to feel out the Dwarfs. Even with these 3 easily redeployable drops, the Dwarfs outnumbered the Legion, and the advance intel wasn’t worth that much. The core of the Basilean force deployed off center and hidden from the cannons as much as possible, and Turn 1 saw the left Ogre Captain rush forward after the war engines with Gnaeus just behind in the woods — unfortunately, Chris was about to learn that cannons ignore cover in v3!
The Dwarfs advanced forward out of range of most of the Basilean charges, and the cannons fired on Gnaeus. Luckily a poor Blast roll only put 2 wounds on the Lord Paladin, and he Iron Resolved down to 1. On the right, the Pathfinder Brock regiment advanced just enough into the woods that the Ogre Captain on that side couldn’t avoid their charge without doing a 180 and moving back 6”, which would have allowed the Brocks free rein on that front.
Turn 2

We don’t have a screenshot of the Dwarf turn 2, but the Basileans advanced to threaten several charges, and the Chaplain charged off into one of the uninspired Mastiff Hunting Packs, hoping for a spiked nerve roll and to tie up the Dwarfs for a turn. The Ogre Captain on the left and Gnaeus maneuvered to charge the cannons next turn, and on the right the Ogre Captain braced himself for the Brock charge. It was unnecessary; the Brocks dropped their Pathfinder banner due to excitement at seeing an unsupported enemy character, and they only managed 7 or 8 hits on 26 dice, needing 4s! Billy’s luck with dice did improve from this point, but only marginally.
More happily for the Dwarfs, the Cannons took off the left Ogre Captain and some vicious throwing dogs tore through a Paladin Foot Guard regiment’s De5 for 5 wounds.
Turn 3

Turn 3 opened for Basilea with a flank charge from the Strider knights into the Brocks, while the Ogre Captain maneuvered around to get a flank on the next regiment of Brocks which were bound to want to avenge their late brothers. The ability to Withdraw 1” and then move within 1” of the unit you were Engaged with is very powerful with Nimble characters/units, as they can really skirt up the sides of a battleline.
Elsewhere, the 2 Paladin Foot Guard regiments charged into the Mastiff Hunting Packs, disbanding both and remaining out of the arc for the flanking Dwarf units. The Ogre Palace Guard hordes advanced in support, and Gnaeus took out a Cannon and turned to face the flank of the Steel Juggernaut and second Cannon.

On the Dwarf Turn 3, Billy took advantage of the Paladin Foot Guard regiments not being inspired to rout one and almost get the other. Shooting against Gnaeus from the Cannon and Steel Juggernaut was largely ineffective, mostly due to Billy’s continuing lessons in how not to roll dice. On the right, the Shieldbreaker horde and second Brock regiment went into the uninspired Paladin Knight regiment and only managed a piddling 7 wounds, not wavering or routing the unit, and holding both up for another turn!
Turn 4

We revealed objective VP values at the end of Turn 3, and Basilea was looking good for the center several. It was also clear at this moment that not routing the Paladin Knights meant that the 2 Dwarf units engaged on that front would likely need to remain there for the rest of the game in order to ensure Billy took those objectives. Perhaps with more time the Shieldbreaker horde would have had the width to take both objectives, but this was unlikely to happen with the knights and Ogre Captain still being alive. Those units went into the Brock regiment, narrowly missing the rout after doing 10 wounds.
The Paladin Knights on the left joined Gnaeus in routing the Steel Juggernaut while the Chaplain held up the Cannon. The armies were entirely joined in the center with the Ogre Palace Guard hordes entering the fray, but the Dwarf line was stout.

King Billiam swore some fairly vulgar oaths at the Ogre Palace Guard Captains this turn and decided to kill them all, no matter the cost. He was successful, with the Brocks and Queen on the right breaking the first and a combo charge in the center breaking the other. The Paladin Knights also were dragged down by a hindered flank charge from the Shieldbreaker horde.
Turn 5

The Basileans cheered as the Paladin Knight regiment from the flank crashed into the Dwarf lines, and the renewed assault shattered the Dwarf center. The units then reformed to begin taking objectives as the day was drawing to an end.
Gnaeus did what Gnaeus does — if you’re a Basilea player, you may know that for as sweet as his stats seem, he’s actually quite the pushover on the battlefield — and he failed to rout the uninspired Dwarf Cannon on the left. This was actually a huge deal as it meant that, should the game end on Turn 6, Gnaeus would not have the movement to take the far left objective, and we’d have a tie.

The Dwarf Turn 5 saw the wounded Brocks take an objective while a desperate charge was mounted against the Ogre Palace Guard horde in the center. The first nerve roll was a spiked 12, but the Inspiring Priest saved the day for The Hegemony.
Turn 6
Realizing he couldn’t make the objective, Gnaeus went back into the Cannon with the Chaplain’s support. In hindsight, the Chaplain should have stayed in that combat the previous turn; there was no reason for him to run off toward the center like he did. Other Basilean moves were spent consolidating on objectives and healing where possible.

King Billiam had had enough of his Dwarfs’ poor dice and ended Turn 6 by routing the Ogre Palace Guard horde! This didn’t change the VP situation, but it sure made the grouchy Dwarf feel better. If the game ends at 6, we have a surprising tie, whereas the game felt like it had been leaning decisively in Basilea’s favor.
Sadly, the Dwarf King was so excited to be rolling high, he didn’t stop to think about the consequences, and a Turn 7 was rolled!
(We should note that just prior to the surprise near-rout of the Ogre Palace Guard in the previous turn, Billy had dropped from the game and had to rejoin. The reconnection evidently gave his virtual dice new life!)
Turn 7 / End of Game

We had an interesting moment regarding Yielding individuals, where the Basilean Priest would have been able in v2 to block the Dwarf infantry from charging the Paladin Foot Guard on the center objective, which while a long shot, would give the Dwarfs the opportunity to steal a tie. In v3, however, Yielding would mean that the infantry could charge right through the Priest unless he had done a wound in hand to hand, which was unlikely with that stout Dwarf De6. It seemed that the Dwarfs were far enough away from the Paladins that there was no way for the Priest to get in the way, so he opted to Heal and Inspire instead. The Dwarfs, for their part, did not break the Paladins, and Gnaeus claimed the last objective for a 5-3 VP win to The Hegemony.
Conclusion — Chris
Gnaeus Sallustis, despite his lukewarm performance against a solitary Dwarf Cannon, continues his record of being undefeated on the field of battle!
The game went generally according to plan, helped significantly by Billy’s poor dice on the right flank. I intended to bunch up on the center, and I hoped that some of the objectives Billy placed in that area were worth something. I was dismayed that 3 of the 4 possible VP that Billy placed were far on the right flank, but luckily that lackluster charge from the Brocks ensured that Billy would need all his strength over there to secure the objectives, keeping some of the units I was most worried about facing, the Brocks and Shieldbreakers, away from the center. Looking back, that was a risky charge for Billy, but the odds were certainly in his favor, especially with Pathfinder.
I made a few mistakes with my Priest not being in Inspiring range a few times, and with the Chaplain not joining Gnaeus on that crucial Cannon charge, but it’s better to be lucky than good, amirite?


