

Note – this article is part of an ongoing series – previous articles can be found here.
After the whirlwind of building, basing, and painting that I completed throughout most of April, I ended the month with a bit of a break. That’s not to say that I didn’t make progress on my army, but the pace was significantly slowed down. Here’s where the army currently stands:
Army: Ogres
Points: 1995
Unit Count: 14
Unit Strength: 24
255, Siege Breaker Horde
— Chalice of Wrath
245, Hunter Horde
— Helm of Confidence
— Crocodog
230, Hunter Horde
— Crocodog
155, Red Goblin Sharpstick Horde
155, Red Goblin Sharpstick Horde
100, Red Goblin Scout Troop
100, Red Goblin Scout Troop
100, Red Goblin Scout Troop
100, Red Goblin Scout Troop
65, Red Goblin Blaster
65, Red Goblin Blaster
170, Ogre Warlord
— Mead of Madness
— Crocodog
145, Kuzlo & Madfall
110, Boomer Sergeant
— Inspiring Talisman
Before I could continue, I needed to replace my paintbrushes. For ethical reasons, I choose to use synthetic brushes. These can work just as well as natural brushes, but they don’t last as long. You can and should clean your brushes (both natural and synthetic) after each painting session (or intermittently during long painting sessions), as that can seriously extend their lifespan. Like most gamers, I use “The Masters” Brush Cleaner and Preserver. It’s a very cheap purchase that will last you a long time.
Over the years I have experimented with different brands of synthetic brushes. There are several good options, but my brush of choice has got to be the Blick Master Synthetic Kolinsky. These brushes aren’t cheap, but they are high quality and, with proper care, will maintain a solid tip. The Winsor & Newton University series is a less expensive option that also performs well. My go-to sizes are 4 and 2 for base coats and washes, and 1 and 0 for highlighting and detail work.

I had a few days remaining in the Counter Charge Spring Painting Challenge and a brand new set of brushes, so I decided to have some fun and paint something for the Hero category. I took to my hobby room and found a truly beautiful Dragon Slayer model from Games Workshop that I built years ago but never got around to painting. Clearly, the time had come!

It has been a while since I painted a model to a high level, and I was excited to give it a try. I am not competent in blending or non-metallic metal, which are generally considered requirements for competition-level painting. But, I do have a solid understanding of color theory and brush control, so I can put together a fairly nice miniature.
Basing and Base Coats


The Mohawk and Beard

The Skin


The Pants

Finishing Touches
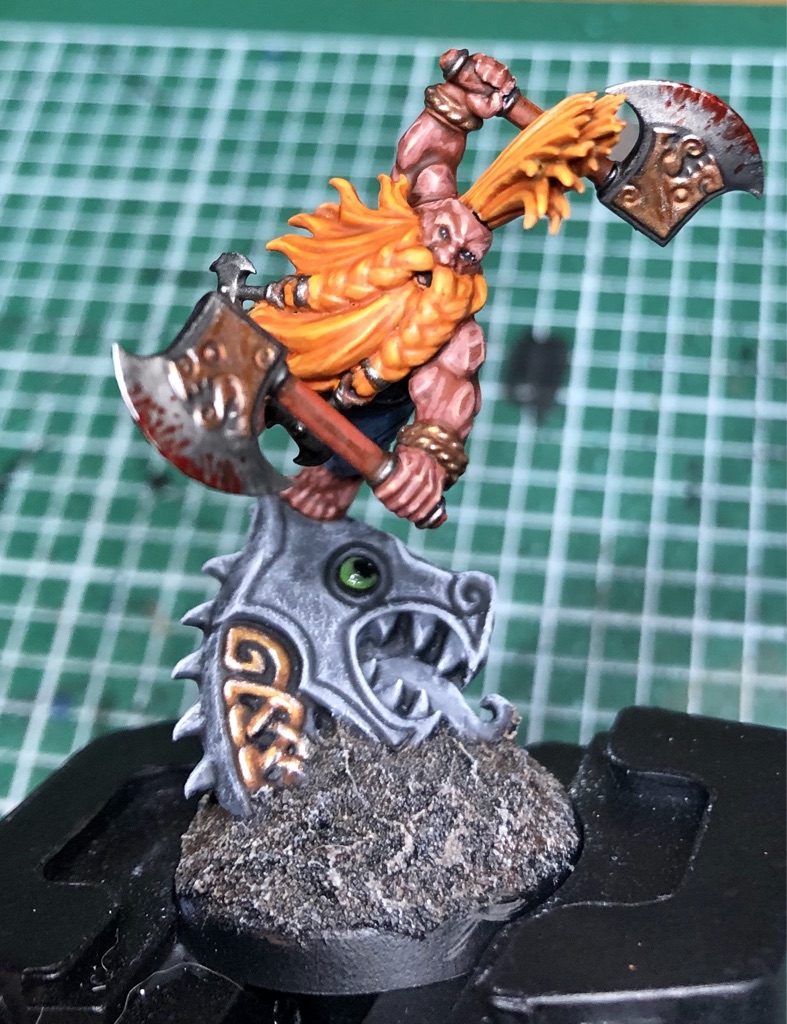
Finally, I trimmed the base with black, added some static grass and purple flowers to contrast with the orange and green in the miniature. It’s not the best model I’ve ever painted, and there are some areas I could have done better, but overall I’m proud of the result. Sometimes it’s just good to know you’ve still got the ability to paint a miniature to a high level.


I’ll be back next week with progress on the actual Ogre army. I’ve started working on Kuzlo and Madfall. I’m using the new GW Loonboss on Giant Cave Squig to represent them. Just a little bit so far, but they’ll be finished for the next blog post!


