

Note – this article is part of an ongoing series – previous articles can be found here.
I have been very fortunate to schedule two recent games with my newly minted Ogre army. As I am not a believer in Universal Battle, these were my first games since early March. I want to make it clear that both games were played in a garage with ample ventilation, between two people who have been following all recommended precautions during the pandemic. There were no spectators involved or shaking of hands. Even so, I realize that in-person gaming is still a potential risk and I do not want to send the wrong message to any -/28 readers. In fact, once I return to work in a few weeks I will be once again excluding myself from in-person gaming, as the concentration of students and teachers within a school building will most certainly increase my risk factor. With that out of the way, on to the gaming!
To any new readers that have stumbled upon my blog, welcome! Here is my 1995 point list (because 1995 is the superior points level, in my opinion):

I know some would consider this blasphemy, but I designed and committed to this list without any playtesting and based entirely on “theoryhammer.” Although the Ogres are new to me, the list has several hallmarks of every army I play. Namely, it has a high number of drops, it includes 4+ units of chaff, it includes a hammer unit with Fearless, Fury, or Headstrong, it includes 1+ units with Pathfinder or Strider, and it includes a unit dedicated to carrying tokens in the Push scenario.
Another conscious choice I made while designing this list was to limit myself to Height 3 and below. I have heard time and again from seasoned Ogre generals that ranged attacks give the army fits, so by eschewing Monsters, Titans, and Chariots I figured I could give myself an edge.
The inaugural game was against Jon, a fellow podcast host and club Dad. He brought his Empire of Dust and accidentally left ten points out of his list.

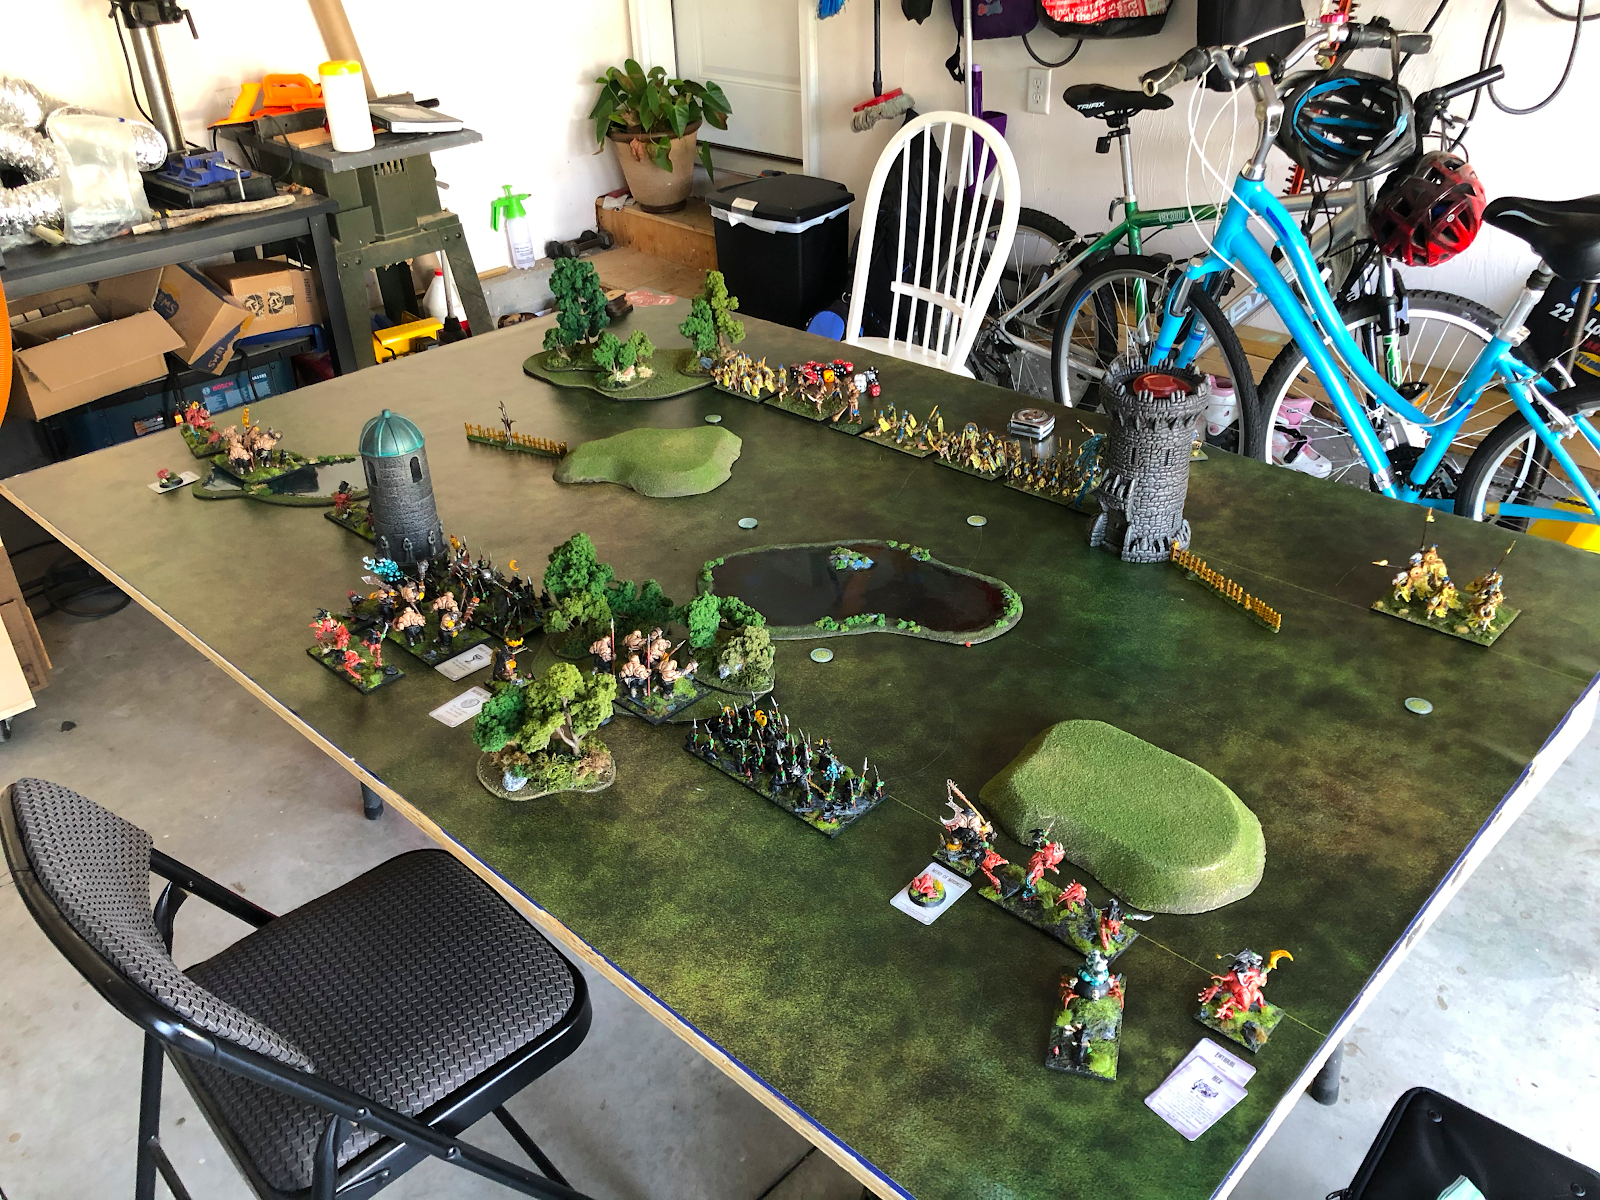
The scenario we rolled up was Raze. Knowing that the Empire of Dust prefers to keep a fairly compact battleline, I spread my objectives out across the board and hoped to outflank him. Here’s a look at deployment:
Turn One
I won the roll for the first turn and advanced aggressively on the flanks but cautiously in the center. I did not want to engage Jon’s main battleline until I had won one or both flanks and would be able to press the advantage. I layered several units, including the Siege Breaker Horde, behind a Red Goblin Sharpstick Horde, planning to eventually sacrifice them to open up some good charges. I knew I would have to face several rounds of bombardments from the Balefire Catapults, but I was hoping that target saturation and/or luck would be on my side.
Jon started the turn by charging his Revenant Cavalry Regiment into my Red Goblin Scout Troop on the right flank. The rest of his army advanced slowly. The Balefire Catapults hit home and put 5 damage on the Hunter Horde in the center of my line, but I escaped without being Waivered. In melee, the Revenant Cavalry Regiment made quick work of the Red Goblin Scout Troop, then reformed to face the inevitable counterpunch.
Turn Two
The Ogre Warlord and Kuzlo & Madfall did just that, combo charging into the Revenant Cavalry Regiment. The Hunters Horde and Red Goblin Scout Troop on the left flank pivoted to face the Mummy Regiment protecting the edge of Jon’s battleline but stayed safely out of their 10” charge range. The rest of my army continued to inch cautiously forward. The Ogre Warlord and Kuzlo & Madfall rolled well and landed 9 points of damage. I then managed to Rout the Uninspired Revenant Cavalry Regiment despite a significant -/17 Nerve. The combination of Brutal and Ravenous Lizard for a -2 penalty meant that my roll of a 6 was just enough to get the job done. Jon and I were both pretty shocked at how effective that charge was, and I was now able to claim my first objective and win the right flank.

Jon’s second turn was similar to the first. He advanced his army slowly forward, angling the Bone Giant to face the collapsed flank. His Balefire Catapults followed up with a stunning performance, adding another 10 damage to the Hunter Horde, bringing the total up to 15. Fortunately for me, Jon rolled the dreaded snake eyes!

Turn Three
With my Hunter Horde barely clinging to life, it was time to engage the main battle lines. The Hunter Horde charged the Skeleton Spearmen Regiment, as I potentially had a chance to Rout them, whereas the Mummy Regiment would shrug off most of the damage thanks to a higher Defense, Regeneration (5+), and Heal (10) kicking around. Kuzlo & Madfall bounded down the right flank to set up a charge on the Balefire Catapults. The Ogre Warlord claimed the objective on the right flank and, alongside a Red Goblin Blaster, threatened the Bone Giant. The screening Red Goblin Sharpstick Horde moved up onto the hill, ensuring that if Jon charged in and Routed them, he would then be on the hill and open for a counterpunch. The Hunter Horde on the left flank moved backward to stay out of charge range of the Mummy Regiment, while the Red Goblin Scout Troop decided the Hunter Horde didn’t need their help and slipped behind the forest, hoping to threaten the Balefire Catapults as well. In melee, the Hunter Horde dealt an impressive 9 damage to the Skeleton Spearmen Regiment but failed to Rout them.

On Jon’s third turn he tripled charged the Red Goblin Sharpstick Horde to tilt the odds overwhelmingly in his favor. The Bone Giant and the Skeleton Spearmen Regiment charged the injured Hunter Horde, as he was legitimately worried that the Skeleton Spearmen Regiment might fail to land a point of damage on their own. The Balefire Catapults finally whiffed and I breathed a sigh of relief, but Jon followed up by Routing both units in melee. Most of his units reformed to limit my charges, but the Skeleton Spearmen Regiment opted to overrun and get closer to one of his objectives, forcing me to deal with them.
Turn Four
Kuzlo & Madfall finally came charging into a Balefire Catapult, eager to put their shenanigans to an end. The Hunter Horde on the left flank decided to charge the Mummy Regiment, figuring it would be a stalemate for a few turns. I really wanted to bring the Siege Breaker Horde into melee, but knew that even if I Routed a unit I would lose them in return. This didn’t seem like a smart trade at this point in the game, so I held them back. Instead, I double-charged an Enslaved Guardian Horde with a Red Goblin Scout Troop and a Red Goblin Blaster, holding them up and hoping to stick some damage. The other Red Goblin Scout Troop in the middle moved forward to prevent the Siege Breaker Horde from being charged. The third Red Goblins Scout Troop was free and clear on Jon’s backline and set up to charge something next turn. The surviving Red Goblins Sharpstick Horde got a flank charge on the Skeleton Spearmen Regiment, and the Ogre Warlord baited a charge from the Bone Giant, with the Red Goblin Blaster prepared to counterpunch.
In melee, the Red Goblin Blaster did a paltry 1 damage to the Enslaved Guardian Horde (cue sad trumpet music) but the Red Goblins Scout Troop added 2. Kuzlo & Madfall easily Routed the Balefire Catapult, reforming to threaten several charges for the next turn. The Red Goblin Sharpstick Horde, despite being Hindered, brought the pain to the Skeleton Spearmen Regiment and rolled… snake eyes. What goes around, comes around! Despite this, I still was able to claim an objective with the Red Goblin Sharpstick Horde. Meanwhile, the Hunter Horde, with the help of their trusty Crocodog, did an unreasonable 11 points of damage to the Mummy Regiment. I promptly rolled a 6 twice (thank you, Brutal) and Routed them. Things were definitely looking good for me.

On his fourth turn, Jon was now in damage control mode. He countercharged the Red Goblins Scout Troop on the hill with the Enslaved Guardian Horde. The Idol of Shobik charged the Red Goblin Scout Troop that was screening the Hunter Horde. The lucky Skeleton Spearman Regiment moved forward and claimed an objective. The Mummy Regiment was kind of boxed in, so it repositioned to open up more options. The other Enslaved Guardians Horde ended up turning around to face Kuzlo & Madfall because taking a rear charge from him could be disastrous. The Bone Giant charged into the Ogre Warlord.
The surviving Balefire Catapult struck home and dealt 4 points of damage to the Hunter Horde on my left flank. Both Red Goblin Scout Troops were Routed, but the Ogre Warlord held his ground.
Turn Five
The only remaining Red Goblin Scout Troop charged the second Balefire Catapult, enabling Kuzlo & Madfall to move forward. I wasn’t concerned about him getting charged by the Enslaved Guardian Horde, as it would draw them away from the objectives. The Hunter Horde charged the Enslaved Guardian Horde on the hill, which was standing upon one of my objectives. The Ogre Warlord and Red Goblin Blaster charged into the Bone Giant. The Siege Breaker Horde charged into the Idol of Shobik, hoping to hold him up and prevent him from casting spells. The Boomer Sergeant, who had been putting meaningless chip damage on units all game, finally came into play. He blocked up the Mummy Regiment to protect the Siege Breaker Horde and force them to make a Hindered charge. The Red Goblin Sharpsticks Horde went back into the Skeleton Spearman Regiment.
In melee, things continued to be swingy. I put some serious damage on the Bone Giant but failed to Rout him. I didn’t roll snake eyes on the Skeleton Spearmen Regiment this time, so they went away. I did some meaningless damage to the Idol of Shobik, and the Red Goblin Scout Troop Routed the Balefire Catapult. However, the Hunter Horde continued to roll well above average, putting 10 damage on the Enslaved Guardians Horde. I promptly followed this up by rolling snake eyes, yet again!

Jon realized he was probably going to control the center objective at the end of the game, which meant if the Enslaved Guardian Horde on the hill could survive he’d be able to keep it to a draw. To that end, he countercharged the Hunter Horde. The Idol of Shobik countercharged the Siege Breaker Horde. The Mummy Regiment charged the Boomer Sergeant, and the Bone Giant countercharged the Ogre Warlord. The second Enslaved Guardian Horde charged Kuzlo & Madfall in the backfield.
To my chagrin, the Hunter Horde was Routed. The Idol of Shobik, Mummy Regiment, and Bone Giant all dealt a few points of damage but couldn’t Rout their opponents (the Boomer Sergeant was Waivered). The Enslaved Guardian Horde punished Kuzlo & Madfall for 11 points of damage. Then, for the fourth time this game, snake eyes reared their ugly head. Jon let out a groan while I danced for joy.
Turn Six
Thanks to some dumb luck, Nimble, and Jon’s unit being on a hill, both Kuzlo & Madfall and the Red Goblin Scout Troop charged around one Enslaved Guardian Horde to charge the other, severely damaged Enslaved Guardian Horde protecting my third objective. My other units did nothing of consequence in melee, but I routed that dastardly Enslaved Guardian Horde and claimed the objective.


On Jon’s sixth turn the Bone Giant finally Routed the Ogre Warlord. He rolled for turn seven but came up short, ending the game with 3 objectives to me and 2 objectives to him.

Reflection
Both Jon and I had some really hot and cold dice. My good fortune led to the collapse of the left flank and the ability to claim my third objective, whereas Jon’s good luck was less impactful. The game felt more like it deserved to be a draw than a win, but I’m not complaining!
In terms of how the different elements of the list performed, I am definitely pleased. The army only has three Hordes of Ogres, but there are so many support pieces that ensure I can deliver them where and when they are needed. The Red Goblin Blasters were kind of a dud, but before they charged they certainly made Jon wary about getting close.
The standout unit for me was Kuzlo & Madfall. He’s able to move around the battlefield very effectively and combo charging him with a Brutal unit is super good. I know some players are reluctant to take him because Ravenous Lizard applies to friendly units too, but it’s really not that difficult to mitigate.
This battle report ended up being longer than expected, so I am going to save the second game for next week. I’d love some feedback on the style of the battle report – did it have too many details, not enough, or the right amount? Were there too many pictures, not enough, or the right amount?


